Date
Mar. 5, 2018


Mar. 5, 2018
For Part 2 of The Anatomy of a Web Page, Coding Tools will be the focus.
Take a deep breath, this article is not intended for individuals who understand code. This article is part of a series so you may want to read Part 1 first or feel free to jump right in like a silly rabbit.
Now, get ready for a good time as we continue to explore what makes a web page tick! Put on your “thinking caps” and let’s get started!
In Part 1 of this series, we concluded with a rather simple, yet somewhat practical, HTML page containing a simple Grocery List and Omelette Recipe:
You might be wondering, what do I use to write a web page to begin with? What the heck is Codepen? Do I need a special piece of software? Do I need to upgrade my computer? How much is this going to cost?
Before you snowball into a dark pit of despair, relax! You already have everything you essentially need and it is already installed on your computer:
There are many web browsers to choose from and not all of them are created equal. With that said, whatever web browser you are using to view this article is just fine to get you started writing and understanding web pages.
Many web developers use Google Chrome, which is commonly just referred to as “Chrome”. Mozilla Firefox, or just “Firefox”, is another popular choice for building and testing websites. Apple’s Safari browser is a decent choice as well, but like I said, please use whatever you like or have available.
This article assumes that if you choose to start writing web code, that you will be doing so on Desktop or Laptop computer. The browsers mentioned above are for both Desktops and Laptops; Yes, there are mobile versions available for each, however most web code is written on a Desktop or Laptop. That’s it… carry on!
Text editors are usually simple writing apps that do not have all the fancy features of a Word Processor like spell checking, decorative templates etc. Windows based PC’s and Macs all come with text editors already installed!
Either of the above is just fine. You might have another text editor installed since you can have more than one installed and running at the same time. Please do not use a Word Processor like Microsoft Word to write code:
Word processors … all use their own code to format things like bold, italic, line breaks, margins etc. Just like you don’t see the HTML code when viewing a web page, word processor code is hidden from you too. But it’s there, and if you have a document that contains code, it will be interfered with by the existing (hidden) code in the document.
So, it looks like you are ready to go! You have a web browser and a text editor. If you are reading this article then you already have a web browser running so simply open a new window or tab by press command + T on a Mac or ctrl (control) + T on a Windows PC.
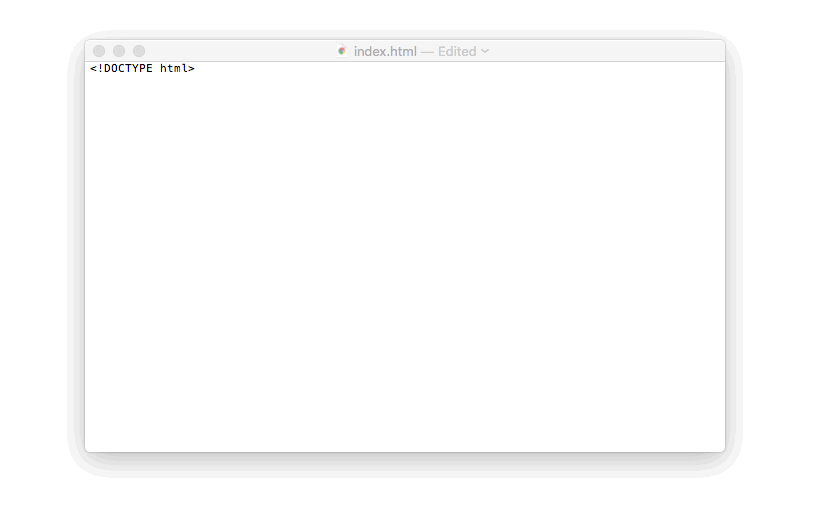
Now let’s write some simple code that is oh so sweet! I am using a Mac so I am going to open TextEdit and type <!DOCTYPE html> as the first line. This simple yet important line of text says to the web browser, “Hey there! The type of document you are reading is in HTML!”. The next step is to save our page as an HTML document which is straightforward enough:
Saving the document as a web page or HTML document is a two-step-and-a-half step process:
1. Changing the file extension .txt to .html.
2. Saving the document with the newly minted .html file extension.
21/2. Ignoring any warning your computer may give you about changing the file extension and select the option to use the .html file extension.
At this point, we have the foundation of a web page saved and ready to go. The foundation of our web page needs a bit more work in order for it to come to life. Like in Part 1 of this series, we need to add some tags:
First, we need to add an HTML starting tag and an HTML closing tag,<html></html>. Next, inside our HTML tags, we add set of head tags and a set of body tags. Let’s take a look at our budding web page so far:
<!DOCTYPE html>

<html>

<head>

</head>

<body>

</body>

</html>
The head tag, consisting of two header tags, is where information is added to the document; The information added here provides more information about the document (the web page). Currently, the header element of our web page is missing a required piece of information… a title! Let’s add a title element:
<!DOCTYPE html>

<html>

<head>

<title>Todays TO-DO List</title>

</head>

<body>

</body>

</html>
Good good. That is all we need to add to the head element for now. The “fun stuff” happens in the body tag, which is where we add the content, in the form of HTML, that we want to display to the viewers of our web page. I am going to copy over the HTML from the web page we created at the end of Part 1 and paste it between the body tags:
<!DOCTYPE html>

<html>

<head>

<title>Todays TO-DO List</title>

</head>

<body>

<h1>Todays To-Do List</h1>

<h2>Grocery List</h2>

<ul>

<li>

Eggs

<img src="https://upload.wikimedia.org/wikipedia/commons/1/1e/Egg_spiral_egg_cup.jpg" alt="A hardbo" height="75">

</li>

<li>

Cheese

<img src="https://upload.wikimedia.org/wikipedia/commons/e/ec/NCI_swiss_cheese.jpg" alt="Swiss Cheese" height="75">

</li>

<li>

Collard Greens

<img src="https://upload.wikimedia.org/wikipedia/commons/thumb/e/e9/Collard-Greens-Bundle.jpg/1200px-Collard-Greens-Bundle.jpg" alt="Collard Greens" height="75">

</li>

</ul>

<h2>Omelette Recipe</h2>

<ol>

<li>Crack 3 Eggs</li>

<li>Mix Eggs</li>

<li>Add Cheese</li>

</ol>

</body>

</html>
Just to recap, anything you added between the body tags will be displayed in the web browser. Now let’s preview our web page in an actual web browser! Follow these simple steps:
.html file extension.Fingers crossed you are now able to see your web page in all its glory. For reference, it should look like this, unless you decided to add your modifications which are completely okay and super-duper awesome!
We now have a simple web page built with HTML! If you decide to make any updates you then only need to resave the file and then refresh/reload the page web if you currently have it open in a web browser.
If you simply just want to write web code and not have to go through the processes above, then give Codepen a try! You can learn more about Codepen before jumping in. Also, you might have noticed I have used Codepen in this article and in Part 1 of this series to provide code examples.
Right now, the web page we have created is not going to win any fashion awards. What I mean is that it does not have a lot of style… so let’s give it some! In Part 3 of this series, we are going to literally give our web page some wild style using Cascading Style Sheets (CSS).

Book with us
Warning: Working with our team may result in excessive creativity, uncontrollable 'aha' moments, and an addiction to perfect pixels. Please proceed with caution.
