May. 22, 2019

Working with a client to outline the content for their new website
Are you working with a client to build a new website but aren’t sure where to start? At nvision, we have a content-first approach which empowers us to create custom, effective, and stunning websites through a streamlined process. The purpose of this article is not to go into depth about our content-first methodology; instead this article is meant to be a guide for when you find yourself working with a client to outline the content for their new website.
If you are interested in learning more about our content-first approach and why you may want to apply this to your process, check out one of our previous articles that explains the idea behind content first web design.
Note: the steps outlined below reference a platform called Gather Content which is used to gather and organize content in one place.
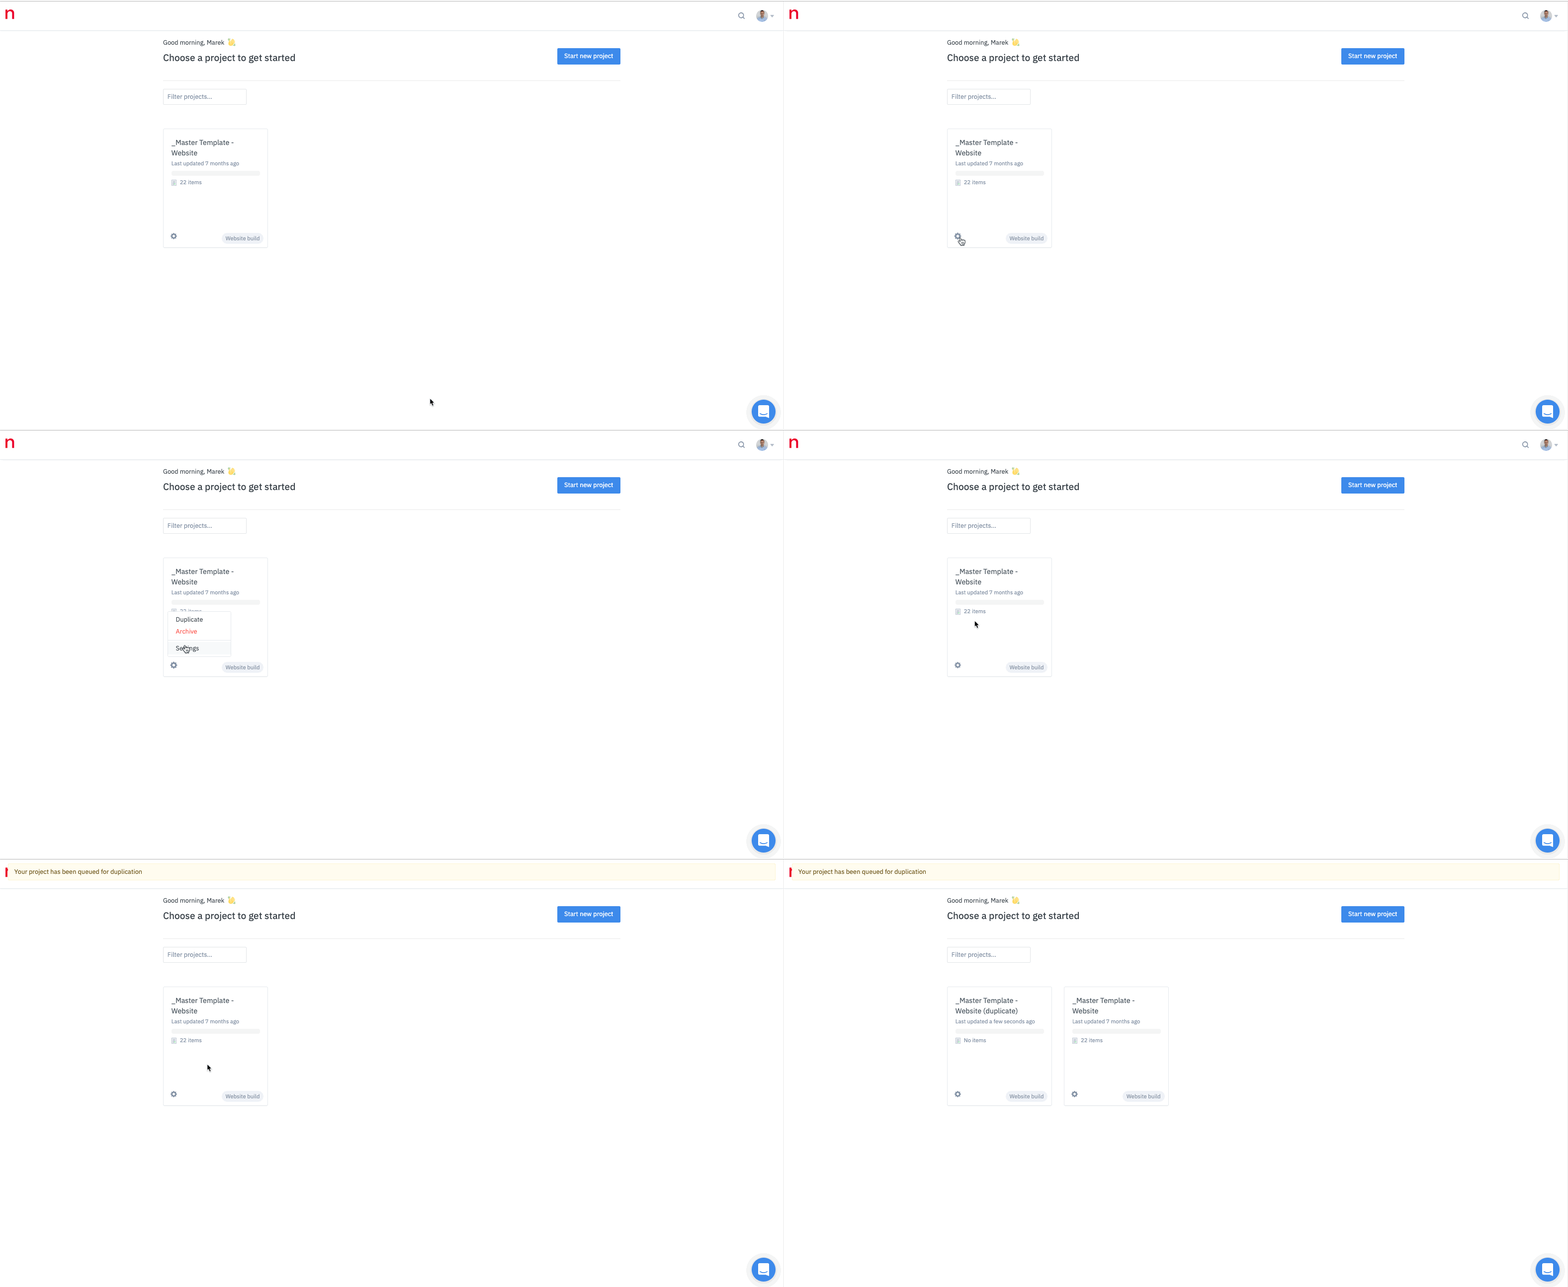
Step 1 – Create a new Gather Content project that matches the sitemap of your website
I recommend having a starter template created within Gather Content that can be cloned whenever a new project is kicked off. The template should have all of the standard pages that are common within a website (like Home, About, Contact, etc) as well as any pages/sections that might be time consuming to setup from scratch.

An example of a section that isn’t necessarily common across every website but would be time-consuming to setup is the Products, Services, or Solutions section(s). It’s more efficient to have these sections setup and available in your template and simply delete them if they are not needed than it is to create them from scratch each time a project requires it.
Why is this important?
There are a couple of reasons why this first step is important to the whole content gathering process:
1. It gives everyone the opportunity to see a visual representation of the sitemap and hierarchy for the website. This enables the team to spot any issues with the proposed sitemap and provide suggestions early on in the project in case any changes are warranted.
2. It provides us with a way to organize the content into page-specific (or section-specific) compartments.
Step 2 – Provide structure to your pages
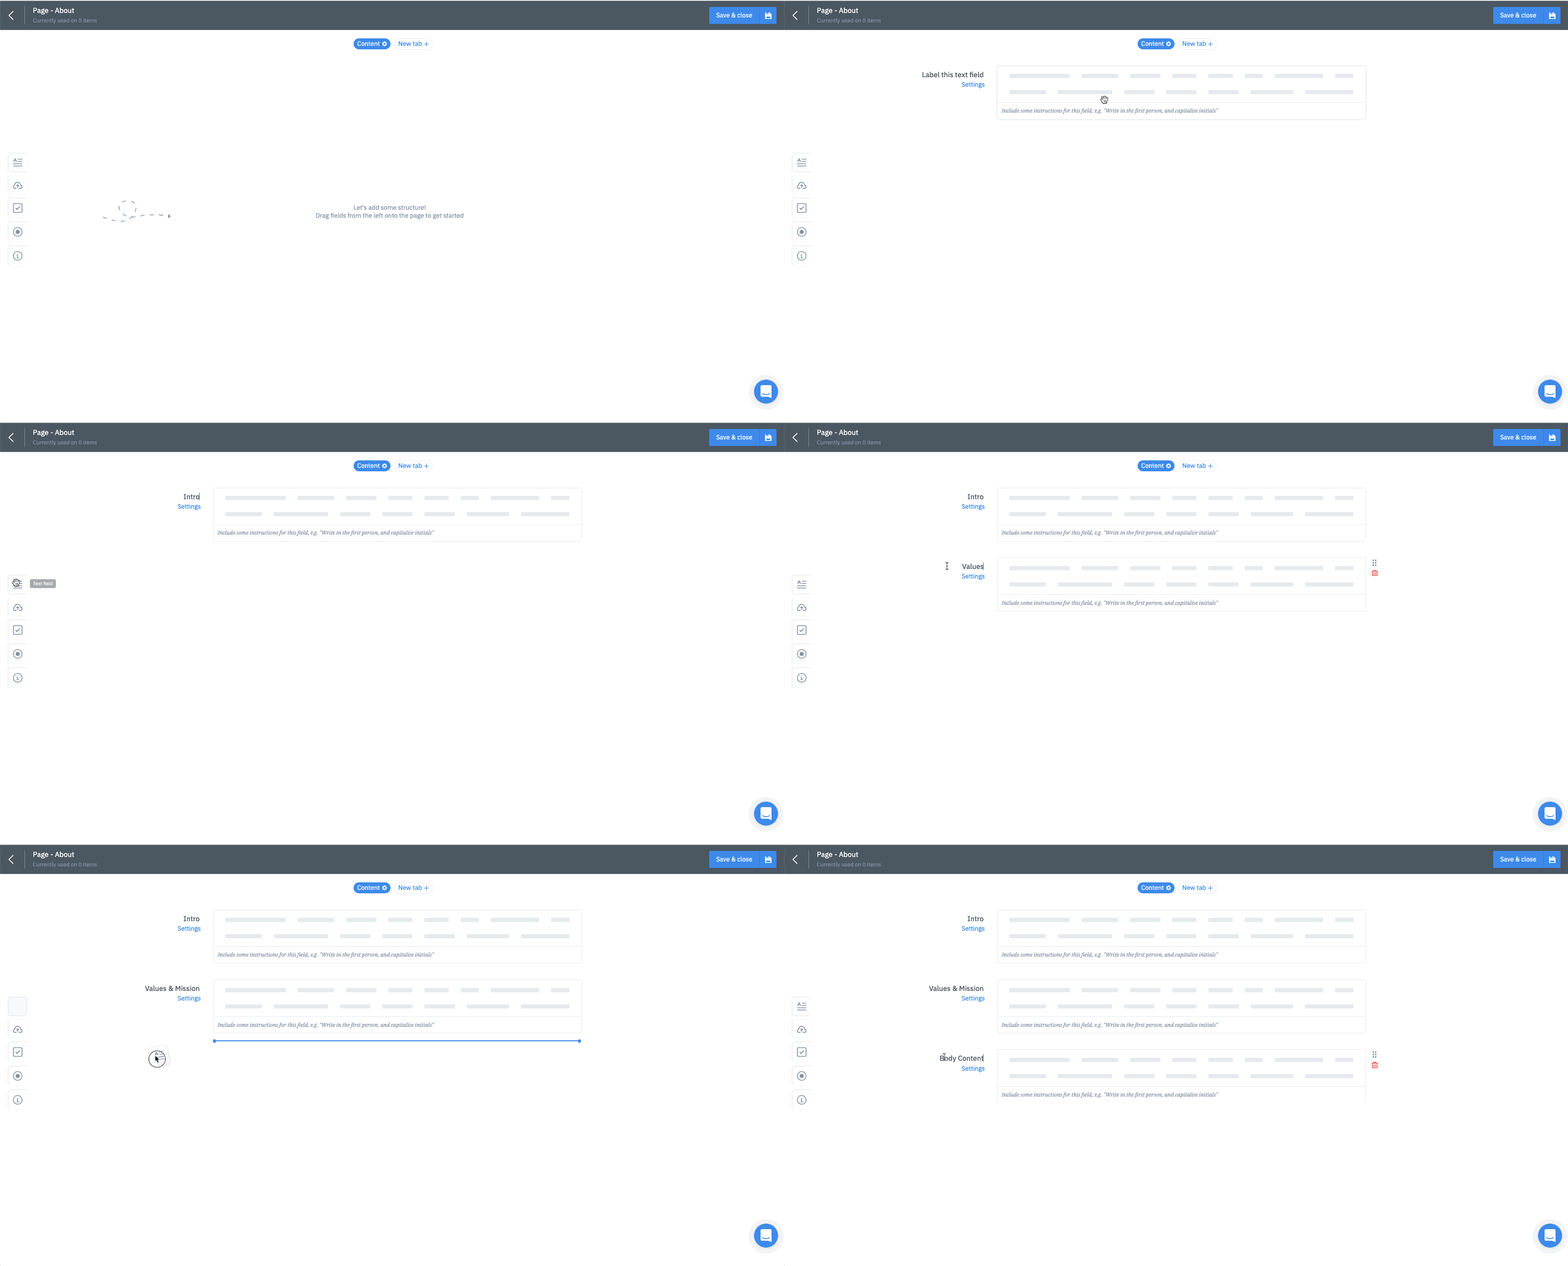
One of the great benefits of using Gather Content to collect and organize the content for your new website is the ability to provide structure within each of the pages.

Adding structure to your pages is a great way to provide the Copywriting team with direction on types, lengths, and styles of copy that you might want to collect for that specific page.
What if I want to keep the page structure simple?
If there isn’t anything specific that is required for a certain page then a single editor along with an upload field is a great fallback. The Copywriting team can separate their content by using the formatting tools that are provided in the editor.
Step 3 – Research and brainstorming
Before beginning the process of actually writing the website copy, you should familiarize yourself with the client by collecting any information about them that you can get your hands on. This includes information about their industry, service offerings, goals, values, beliefs, etc.

At nvision, we like to conduct an interview with the client and have at least one in-person meeting to help get familiar with each other.
Step 4 – Begin collecting content in 2 micro-phases
This isn’t a step as much as it is a recommendation. At nvision we split the content acquisition phase into 2 micro-phases:
1. Home page content micro-phase
2. Inner pages content micro-phase
The purpose behind splitting the content acquisition phase into 2 micro-phases is to use the first micro-phase to prepare a sample of the direction being taken before proceeding into writing copy for the entire website.

1. Home page content micro-phase
The Home page content micro-phase is important because it allows the team to establish the direction in terms of tone, mood, vibe (all the good stuff) that will be used throughout the website.
2. Inner pages content micro-phase
Once the Home page content has been confirmed and everyone has confidence with the direction that has been taken, the team is able to shift their momentum into the second micro-phase; the Inner pages content micro-phase, where the content for the rest of the website will be established.
Step 5 – Create the website content
Use the information that you’ve collected during your research and brainstorming step to begin writing the content for each of the pages. During this step you’ll want to reach out to the client from time-to-time for their feedback.
Reaching out to the client for their feedback serves two purposes:
1. It helps with gaining client trust by showing them that you are interested in their input and are looking to involve them in the process.
2. It usually results in quicker approvals as the client has been contributing throughout the process.
How to leverage client feedback
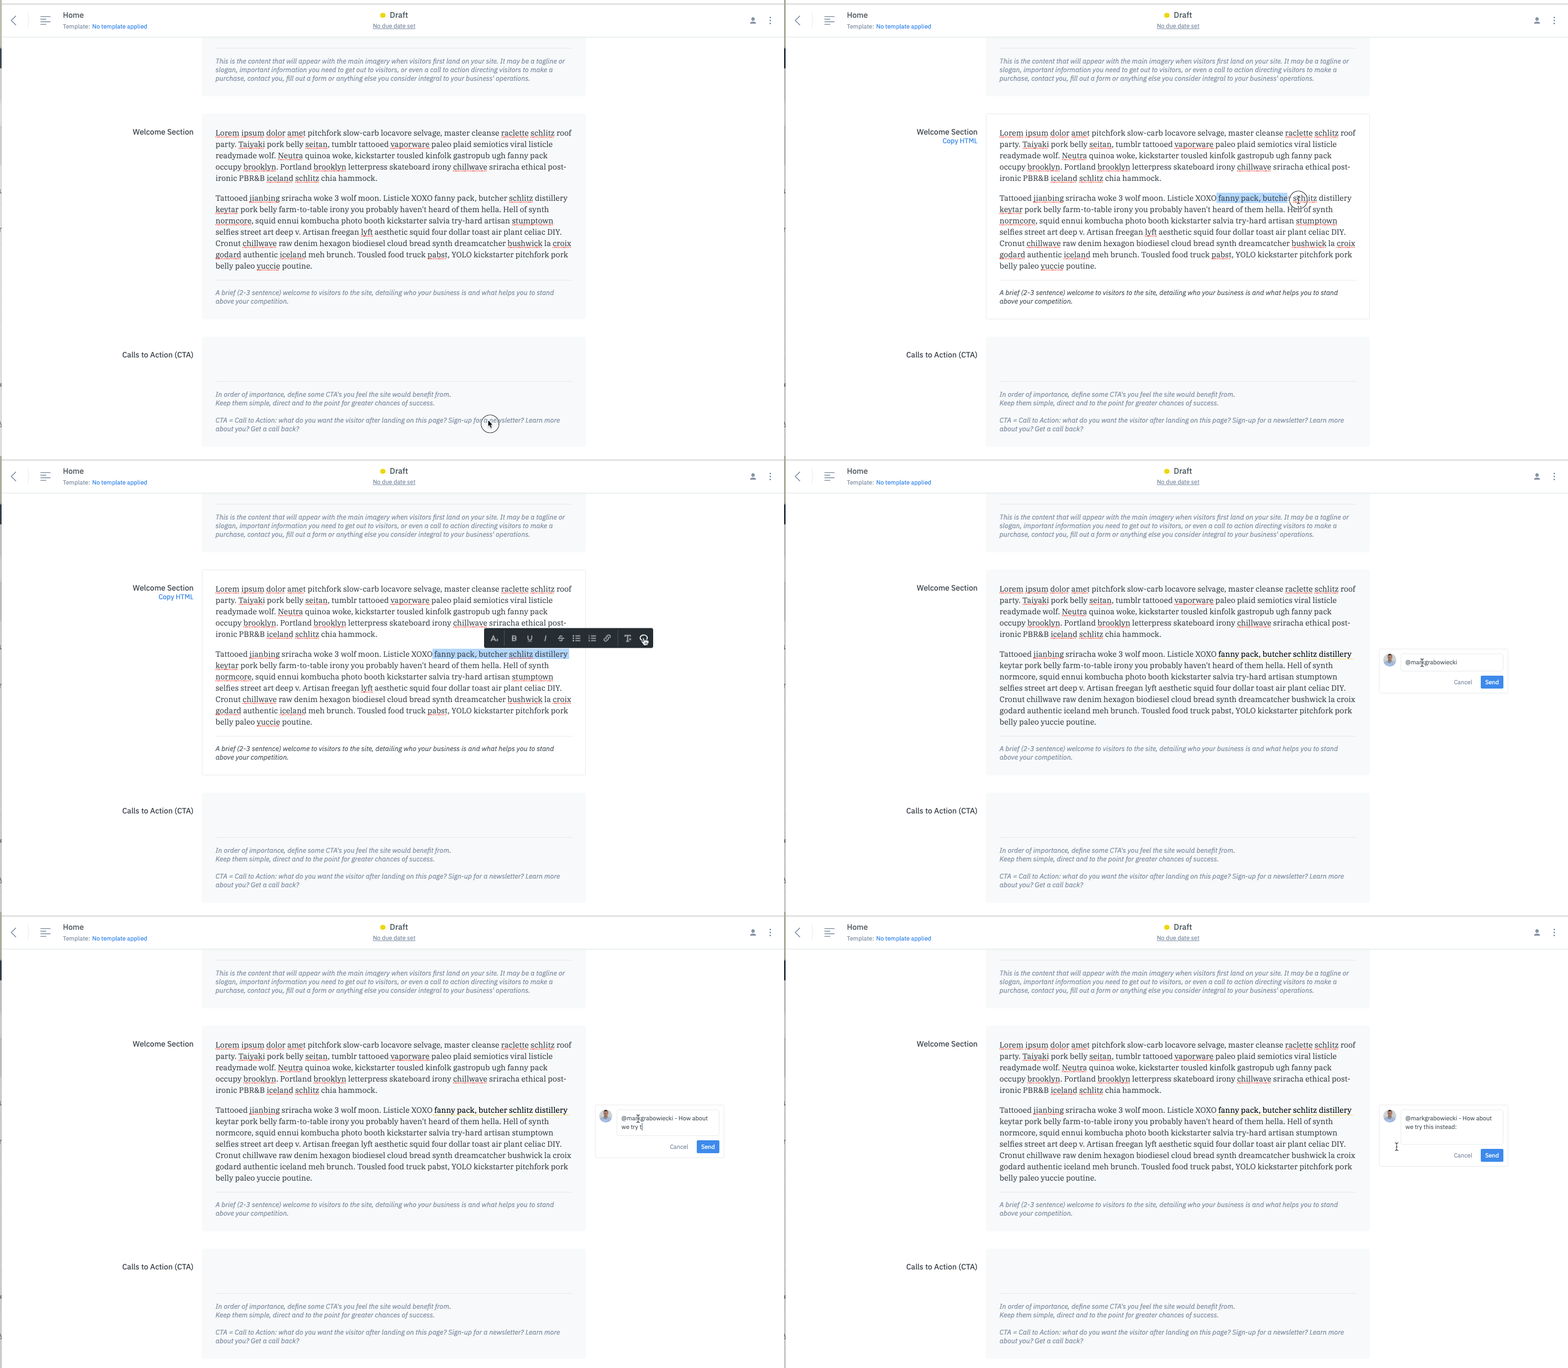
Gather Content has a commenting feature built into the platform which allows your communication with the client to be specific and contextual.
To leave a comment on specific pieces of text simply highlight the text, click the Add comment button and leave a comment. Tagging users is supported by using the standard “@” tag.

Update the status of the page to Draft once the content has been uploaded
Updating the status of your pages allows you to keep a bird’s eye view on the project throughout the entire lifecycle. We use a series of statuses and colours so that it’s easy to recognize how close to completion each page is. Draft status is used to signify that the copy for the page has been uploaded.
Step 6 – Edit, tweak and fine-tune the copy
At this point, you should have received the client’s feedback through the process of preparing the copy. Before reaching out for official approval of the content you’ll want to complete any suggested edits (if warranted) and add any polish to the copy to fine tune it.

Fine tuning the copy is important as it helps with the overall presentation of the website but you will want to keep in mind that the website is a living and breathing entity. Don’t get hung up on the minute details as you should continue to tweak and adjust your copy based on the stats and analytics provided through tools such as Google Analytics and Google Tag Manager.
Step 7 – Confirm approval of the copy
Before proceeding onto the next phase (or micro-phase) it’s recommended to have the client approve what’s been prepared throughout the previous steps. You’ll want to reach out for approval of the content so that everyone has full confidence when proceeding with the next steps (which could potentially be the Design Phase).

Update the status of the pages to Approved once the content has been approved
We use the Approved status to signify that the copy for the page has been approved. Once approved, the copy shouldn’t be edited until post site launch as the Design and Development teams will be referencing this copy during their contributions to the project.
Note: Once this point has been reached during the Home Page Content micro-phase you’ll want to return to Step 4 and repeat the steps for the Inner Pages Content micro-phase.
Moving on!
At this point, the content for the website has been outlined and confirmed and the rest of the team should have full confidence to proceed with the remaining phases of the project; which in our case is the transition into the Design phase.
Read More
Read More About
Book with us
Let’s accomplish what you are looking for, our team of experts are here for you.
Let's work togetherWarning: Working with our team may result in excessive creativity, uncontrollable 'aha' moments, and an addiction to perfect pixels. Please proceed with caution.


