Date
May. 14, 2014


May. 14, 2014
The Photoshop pen tool may seem confusing and tricky to learn at first but proves itself to be very useful to learn for web design & this tutorial will provide the basic terms, functions, and uses of the pen tool. Once you get used to the tool, you’ll find yourself growing comfortable and naturally making perfect lines that will suit your needs. Feel free to open up a blank document in Photoshop to follow along.
The pen tool is essentially used to make lines and shapes using vectors (math) instead of pixels. This tool will let you perfect the shape and curve of your lines while having much more control than let’s say, any of the lasso tools. Though the pen tool is mainly used to make paths, it is not the only tool you can use; the shape tool, for example, can assist you in making geometric shapes using paths. This tool, however, is quite limited while the pen tool gives one more freedom for any shape you could make which would be much too diverse and specific for the shape tool to handle.
There are 2 modes you can use when using the pen tool. At the top where your pen tool toolbar is, there are three icons; select the one known as the “path mode”. The other mode is known as the shape mode, which is not what we will want in this case. The third icon is not a mode but rather used to fill in the shape once the path created has been closed and becomes a shape.
![]()
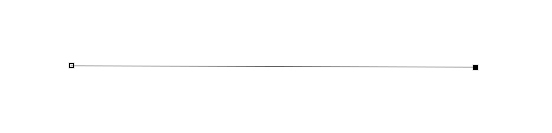
First make a point with the pen tool by clicking anywhere in the document. A dot will appear which is also known as an anchor point. Click somewhere else in the document and a path (line) will appear in between those anchor points. Now it is time to form this line into more dynamic shape.
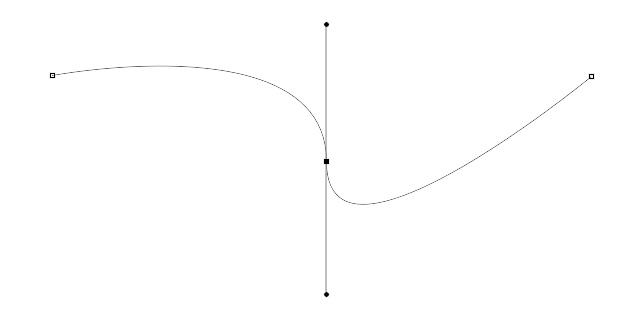
Make another point by clicking anywhere on your line. If you make a mistake or do not like where you have placed an anchor, press alt+⌘+z (alt+ctrl=z for pc) on your keyboard to undo that action, continuously pressing this shortcut on your keyboard will get rid of past mistakes one by one. Now with that anchor that you made in between your first two anchors, hold ⌘ command (ctrl on pc) and drag it anywhere, in this image I dragged downwards and ended up with a curve like this.
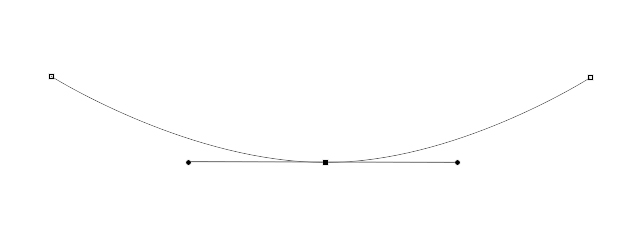
The two lines coming out of the anchor you just pulled out are called directional handles. If you hold down ⌘ command on mac (ctrl on pc) and drag one of these points, you can change the angle of the curve you had previously made. I dragged the right directional handle downwards 90 degrees, if you want accurate angles in 45 degree intervals, hold ⌘ + shift (ctrl+shift on pc) while dragging one of these handles. When you hold the ctrl button while dragging one of these directional handles, the one parallel to it will move simultaneously. If you want to move only one handle, press opt (alt on pc) on your keyboard instead and drag.
You can place much more points on your line to get the curves and angles you want, or make your line longer by clicking anywhere else on the document to add points. You can move back and forth between anchors if you really wanted to; to select another anchor, simply hold down ⌘ command (ctrl on pc) and click that anchor to play around with it. If you no longer wish to do anything with your path and leave it as it is while you do something else in photoshop, you can just hold the ⌘ command (ctrl on pc) button and click on a blank space on the document and your path will be left there for you to come back to if you wish. This is recommended if you want to make multiple paths but not necessarily want to have them directly connect to each other.
When satisfied with the shape of your line, you can now stroke it meaning photoshop will actually draw your line with pixels. To do this, hold ⌘ command (ctrl on pc) button and click on a blank space on the document to make sure none of your paths are selected. Then right click anywhere in the document and choose “Stroke Path…”. A window with a drop-down menu will pop up and you can choose what tool you want photoshop to use to draw your line. In this case, I will be choosing brush. 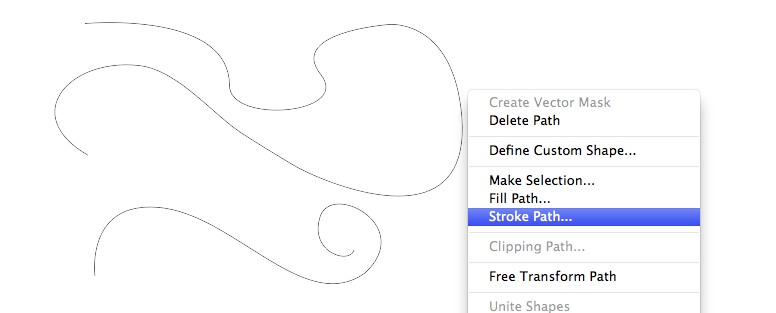

Important note: The pen tool will base your selection of the tool you want to use on previous settings. For example, since I chose brush as my stroke tool, and the brush was last set to a soft 15 px brush, the line made from the path will have the same settings. To change this, simply go to your brush tool and change the settings there before stroking your path, remember, your path will still be there when you come back to your pen tool. The colour of your stroke will also depend on your current foreground colour.
After selecting your tool to stroke your path, you can choose whether or not to stimulate pressure by clicking the box or leaving it blank. Checking this box will stimulate pen pressure while as leaving it unchecked will create a nice, even line.

After you have stroked your path, it is time to remove our path selection. To do this you can either:
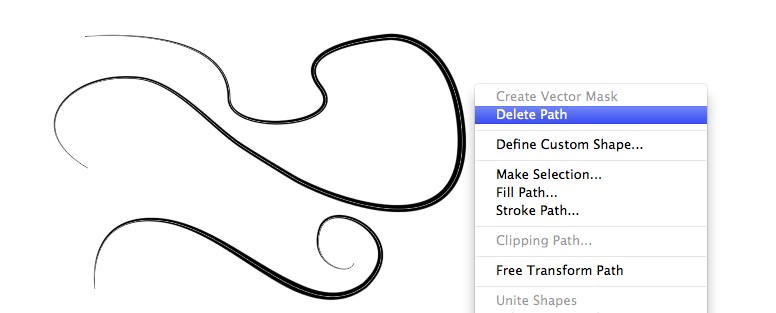
Once you delete your path, you officially have your lines.

Let’s accomplish what you are looking for, our team of experts are here for you.
Let's work togetherWarning: Working with our team may result in excessive creativity, uncontrollable 'aha' moments, and an addiction to perfect pixels. Please proceed with caution.