Dec. 3, 2014

Gravity Forms event tracking with Google Analytics
UPDATED DEC 3rd, 2014: Plugin is now on the repository! Due to the popularity of this post and the demand for a robust Google Analytics event/conversion tracking plugin for Gravity Forms, I have further improved the features of this plugin and launched it on the official repository. You can also find it on GitHub.
Jump to section:
We’ve implemented Google Analytics Event Tracking on numerous occasions in the past with Gravity Forms submissions using the popular method of placing the tracking event JS snippet in the confirmation page settings in Gravity Forms for our digital marketing. However, we previously built a huge site with over 40 individual Gravity Forms, each requiring event tracking for submissions. We wanted a more manageable and scalable approach to the situation than the aforementioned method.
Enter, Gravity Forms Google Analytics Event Tracking!
Features
- Automatically send form submission events to Google Analytics
- Custom event categories, actions, labels and even values
- Dynamic event value on payment forms
- Respects payment feed conditionals
- Works with all Payment Processor plugins
- Respects the PayPal Standard IPN response before converting
- Awesomeness
Download from WordPress.org
Setting up your event tracking goal in Google Analytics
This specific example will work with the default plugin settings. But feel free to set this up however you want!
Configure Gravity Forms Event Tracking Settings
To get the plugin working, you first have to tell Gravity Forms your Tracking UA ID. Where do I find my Tracking UA ID?
Once you’ve got your UA ID, you can enter it on the Event Tracking settings page within Gravity Forms:
Configuring event settings on a per form basis
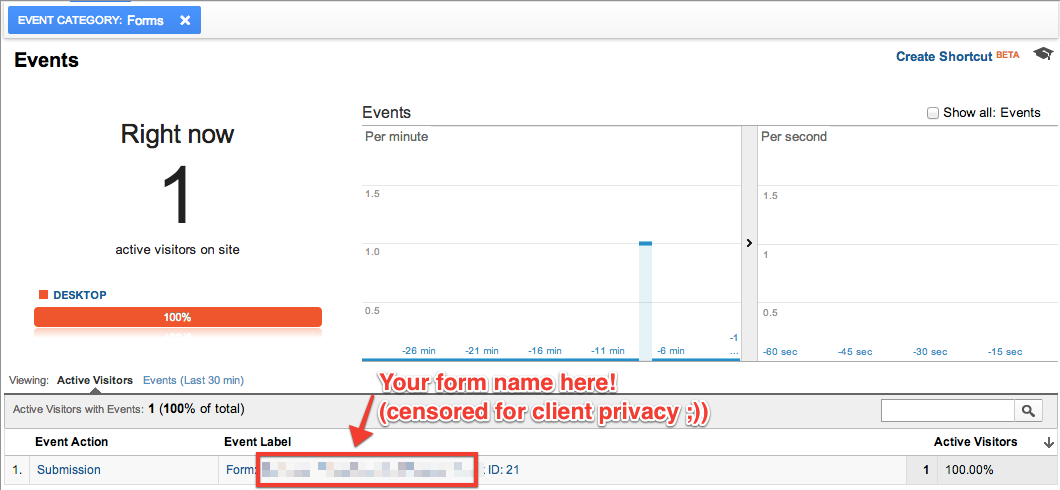
By default, the plugin will send the following information to Google Analytics:
Event Category: Forms
Event Action: Submission
Event Category: Form: [form-name] ID: [form-id]
Should you wish to change things, or add a custom event value, there is a configuration section on the bottom of each forms’ main settings page:
Once everything is set up, you should be off to the races!
Make sure you:
- Setup your UA ID in the Gravity Forms Settings section
- Configured your event in Google Analytics
- Changed any event settings on your form(s) as necessary (optional if you are using the default event detailed above)
All done!
If you’ve followed the steps above, your Gravity Forms should now have Google Analytics event tracking! These events will show up with a label containing the form title and the form ID.
If you have any questions, don’t hesitate to comment below or send me a tweet.
The following information is for more advanced users to learn about the underpinning technology
Event Tracking with the Google Analytics Measurement Protocol
What we’re doing under the hood with server-side Google Analytics Event pushing
You’re probably more familiar with implementing event tracking using Javascript, however today we’re going to be looking at implementing event tracking in Gravity Forms using the Google Analytics Measurement Protocol. This will enable us to easily account for all use cases and implement accurate tracking.
What is the Measurement Protocol?
The Google Analytics Measurement Protocol allows developers to make HTTP requests to send raw user interaction data directly to Google Analytics servers. This allows developers to measure how users interact with their business from almost any environment.
Look ma! No Javascript!
Essentially, this allows us to make a server-to-server connection with Google and send the event using PHP. What this means is we can hook into one of the Gravity Forms PHP actions rather than a jQuery trigger as I previously detailed.
Using the Measurement Protocol
In order to save a lot of time and energy, I’m going to utilize a PHP library I found on github: https://github.com/ins0/google-measurement-php-client. In terms of implementing this I highly recommend setting this up as a plugin, however it is possible to use your theme folder and functions.php file. In the plugin linked at the bottom of this post I’ve included a settings page for entering your UA tracking ID on.
Once you’ve got the PHP client extracted to a folder, using it to send events is incredibly simple. First you need to include the library as follows:
require_once( 'PATH/TO/src/Racecore/GATracking/Autoloader.php');
RacecoreGATrackingAutoloader::register(dirname(__FILE__).'/PATH/TO/src/');
Make sure you replace “PATH/TO” with the correct path to the library.
I’m going to use the Gravity Forms hook gform_after_submission to track our events.
add_action('gform_after_submission','track_gf_form',10,2);

function track_gf_form($entry,$form){
	// init tracking
	$tracking = new RacecoreGATrackingGATracking('UA-XXXXXXX-Y',false);

	$event = new RacecoreGATrackingTrackingEvent();
	$event->setEventCategory('Forms');
	$event->setEventLabel('Form: '.$form['title'].' ID: '.$form['id']);
	$event->setEventAction('Submission');

	$tracking->addTracking($event);

	try {
	    $tracking->send();
	} catch (Exception $e) {
	    echo 'Error: ' . $e->getMessage() . '<br />' . "rn";
	    echo 'Type: ' . get_class($e);
	}
}
Read More
Read More About
Book with us
Let’s accomplish what you are looking for, our team of experts are here for you.
Let's work togetherWarning: Working with our team may result in excessive creativity, uncontrollable 'aha' moments, and an addiction to perfect pixels. Please proceed with caution.


